
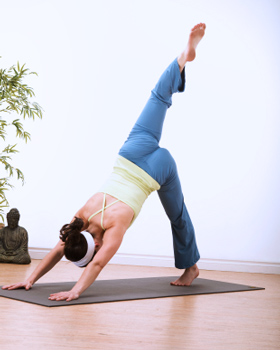
How to Do Three-Legged Downward Dog in Yoga
- Three-Legged Downward-Facing Dog (Tri Pada Adho Mukha Svanasana)
- One-Legged Downward-Facing Dog (Eka Pada Adho Mukha Svanasana)
- Downward-Facing Dog Split
Yoga teachers will often shorten the title, calling it “Three-Legged Dog,” “Down Dog Split,” or other variations. You can't always know for sure, but when you're in Downward-Facing Dog and your teacher says to lift one leg, this is the pose you'll likely be moving into!
Benefits of Three-Legged Downward Dog
Three-Legged Downward Dog has all of the same benefits as Downward Dog:
- Full-body stretching
- Strength building
- Energizing and rejuvenating the nervous system
- Relief from stress, headaches, fatigue, poor digestion, and back pain
This variation has the added bonus of opening your hips and ribs while improving your body's overall balance! It will build strength in your upper body, arms, and shoulders in no time. It will also quickly tone your hips, butt, and thighs.
In truth, it matters less what we do in practice than how we do it and why we do it. The same posture, the same sequence, the same meditation with a different intention takes on an entirely new meaning and will have entirely different outcomes.
Cautions
Do not practice Three-Legged Downward-Facing Dog if you have severe carpal tunnel syndrome or are in late-term pregnancy. It should also be avoided by those with injuries to the back, arms, or shoulders; and by those with high blood pressure, eye or inner ear infections.
Instructions

- Begin on your hands and knees. Align your wrists directly under your shoulders and your knees directly under your hips. The fold of your wrists should be parallel with the top edge of your mat. Point your middle fingers directly to the top edge of your mat.
- Stretch your elbows and relax your upper back.
- Spread your fingers wide and press firmly through your palms and knuckles. Distribute your weight evenly across your hands.
- Exhale as you tuck your toes and lift your knees off the floor. Reach your pelvis up toward the ceiling, then draw your sit bones toward the wall behind you. Gently begin to straighten your legs, but do not lock your knees. Bring your body into the shape of an “A.” Imagine your hips and thighs being pulled backwards from the top of your thighs. Do not walk your feet closer to your hands — keep the extension through your whole body. This is Downward-Facing Dog.
- Step both feet together. Then, with your arms and legs straight, inhale and lift your right leg straight back and up, high in the air. Flex your right foot and reach back through your heel.
- Internally rotate your lifted leg so your knee and the top of your foot point down toward the mat. This will cause your right hip to lower slightly. Reach back further through your right heel and then draw up again through the back of your thigh.
- Keep your standing leg strong and your shoulders squared to the top of your mat. Imagine that your hands and heels are aligned along one straight, diagonal line.
- To open your hips even further, bend your right knee and lift it high toward the ceiling. Tilt your pelvis, drawing your right hip up. Lift your thigh high so that your right hip stacks directly above your left hip. Reach your right foot across the back of your body, as if you're trying to touch your left ear with your right toes.
- Press the floor away from you as you lift through your pelvis. Firm the outer muscles of your arms and press your index fingers into the floor. Draw your shoulder blades into your upper back ribs and toward your tailbone. Broaden across your collarbone.
- Keep your standing leg firm. Sink your standing heel toward the floor.
- Align your ears with your upper arms. Relax your head, but do not let it dangle. Gaze between your legs or toward your navel.
- Hold for 5-20 breaths.
- To release, exhale as you lower your right foot to the mat and place it next to your left foot. Repeat the pose on the opposite side.
Modifications & Variations
As it is, Three-Legged Downward-Facing Dog is already a challenging variation on the standard pose. For an even greater challenge, try it one-handed: When your right leg is lifted, reach your left arm straight behind you. Rest the back of your hand on your low back. Come back to Downward-Facing Dog and repeat on the other side.
Tips
Three-Legged Downward Dog will stretch and strengthen the whole body, when done correctly. Keep the following information in mind when practicing this pose:
- Since Downward-Facing Dog is the foundation for Three-Legged Downward Dog, it's important to get the alignment correct first in Downward-Facing Dog. Thoroughly review the information in the iSport guide, How to Do Downward-Facing Dog in Yoga,before trying this variation!
- You can use Three-Legged Downward Dog as a transitional pose for a Vinyasa or Flow practice. From the lifted-leg position, exhale as you lower your leg and sweep your leg below your body. Place your foot on the floor between your hands. Lift your torso to come directly into a standing pose, such as Warrior II or Crescent Lunge.
- Remember, your standing heel does not need to touch the ground. Do not worry about it — avoid walking your feet closer to your hands for this purpose. Maintain the length of your spine and the lift of your pelvis.
Good Dog Yoga
Practicing Three-Legged Downward-Facing Dog is a great way to warm your body and prepare it for deeper poses. It adds flow and fun to your practice, while providing a greater challenge to your body and mind. Shake up your practice with this variation and you might discover that the feeling of freedom extends to all areas of your life, on and off the mat.


