
Hip-opening Yoga Poses for Beginners

Tight hips are a common problem these days. Activities that emphasize the lower legs, such as running, biking, and jumping, can cause the outer hips to tighten. Time spent sitting at desks, in cars, and on the couch can cause the frontal hip flexors to become stiff. Like hamstrings, hips can get tight by both overuse and underuse. Yoga can help to increase your hip flexibility, which will create a greater range of motion for all of your movements and activities. Here is a short routine for beginners to start increasing hip flexibility. It's important to remember that yoga is not a competition! Have fun and take it easy. Over time, you'll gain all of the benefits yoga has to offer.
The Sequence
It should take about 20 minutes to complete all of the poses. Practice the sequence daily and take it slow. Tight hips might take a while to loosen, but you'll risk injury to your groins or thighs if you try to force them open. Always remember these general guidelines for practicing yoga:
- Move slowly in and out of the poses.
- Keep your breath smooth and even throughout the practice.
- Practice with an empty stomach.
- Never strain or force yourself beyond your current abilities.
Stick to the exact order of this sequence. Do not change the arrangement of the poses. It has been organized to bring you the most benefits. Be sure to check with your doctor before practicing yoga if you have any injuries, health issues, or concerns.
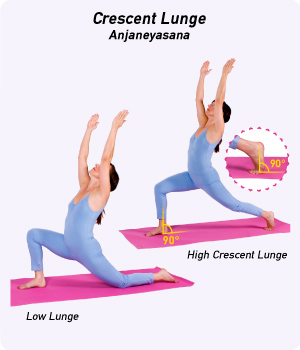
This modified variation on Crescent Lunge — Anjaneyasana (AHN-jah-nay-AHS-uh-nuh) — stretches the hip flexors and thighs, while also helping to open the abdomen, chest, and shoulders.
- Begin standing at the top of your mat. Bend your knees, fold forward, and place your hands on the mat. Then, step your left foot to the back of the mat.
- Align your right knee over the heel of your right foot.
- Lower your left knee to the floor and slide your leg back a few inches. Un-tuck your left toes and rest the top of your left foot on the floor.
- Inhale as you raise your torso to an upright position. Sweep your arms overhead. Draw your tailbone toward the floor. Gaze up at your thumbs.
- Hold for up to one minute. Step both feet forward to the top of the mat again, and come to a full standing position. Repeat on the other side.
.jpg)
A standard pose in many yoga styles, Extended Triangle — Utthita Trikonasana (oo-TEE-tah tree-koh-NAH-suh-nuh) — tones the legs and stretches the hips, groins, and hamstrings. It also opens the chest and shoulders, and helps to relieve lower back pain, stress, and sluggish digestion.
- Begin standing at the top of your mat. Turn to the left and step your feet wide. Extend your arms out to the sides at shoulder height. Your feet should be as far apart as your wrists. Rotate your right (front) foot 90 degrees, so your front foot's toes point to the top of the mat. Turn your left toes in slightly. Align your front heel with the arch of your back foot.
- Reach through your right hand in the same direction that your right foot is pointed. Shift your left hip back, and then fold sideways at the hip. Rest your right hand on your outer shin or ankle. If you are more flexible, place your fingertips on the floor. You can also place your hand on a block.
- Align your shoulders so your left shoulder is directly above your right shoulder. Gently turn your head to gaze at your left thumb.
- Hold for up to one minute. To release, inhale and press firmly through your left heel as you lift your torso. Lower your arms, change the position of your feet, and repeat on the opposite side.
3. Tree Pose

A popular balancing pose, Tree Pose —Vrksasana (vrik-SHAH-suh-nuh) — stretches the hips, thighs, torso, and shoulders. It builds strength in the ankles and calves, and helps remedy flat feet.
- Begin standing with your feet together. Slightly shift your weight to your left foot. Bend your right knee, then reach down and clasp your right ankle. Use your hand to draw your right foot alongside your inner left thigh. Do not rest your foot against your knee, only above or below it.
- Rest your hands on your hips and lengthen your tailbone toward the floor. Fix your gaze softly in front of you. Press your right foot into your left thigh.
- For a deeper pose, extend your arms above your head, reaching your fingertips towards the sky. To deepen your pose even more, try closing your eyes.
- Hold for up to one minute. Step your feet together again, and then repeat on the opposite side.

Sometimes called “Simple Cross-Legged Pose with Support,” this pose — Salamba Sukhasana (sah-LAHM-bah soo-KAHS-uh-nuh) — stretches the hips, knees, and ankles, while also strengthening the back. Sitting upright with your spine aligned reduces stress and anxiety.
- Sit on the edge of a firm blanket, or on a block, bolster, or meditation cushion. Cross your legs in front of you at the shins.
- Balance your weight evenly across your sit bones. Align your head, neck, and spine. Lengthen your spine, but soften your neck. Relax your feet and thighs.
- Hold for up to one minute, breathing gently and evenly.
- Release and change the cross of your legs.
Don't sit flat on the floor! Sitting with your hips above the level of your knees greatly reduces stress and strain on your hips, knees, and back. Sitting propped up will also help open your groins and bring your spine into proper alignment. So, sit as high as you need to let your knees drop open easily — on a blanket, a pile of firm blankets, a bolster or block, or a meditation pillow. Experiment with various heights of support to find the one that is most appropriate for you.
5. Bound Angle (or Cobbler's) Pose
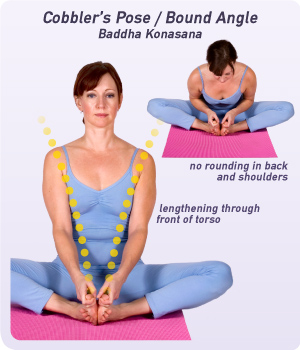
Bound Angle Pose, also known as Cobbler's Pose — Baddha Konasana (BAH-duh cone-AHS-uh-nuh) — is a seated posture that opens the hips, groins, knees, and inner thighs. It also improves circulation and blood flow throughout the body, and helps to calm the mind.
- Begin seated with your spine straight and your legs extended in front of you on the mat. Rest your arms at your sides with your palms on the mat.
- Bend your knees and draw your heels in toward your pelvis. Press the soles of your feet together and let your knees drop open to both sides.
- Clasp your big toes with your first two fingers. Press the outer edges of your feet firmly together and into the floor.
- Sit up straight. Extend through the length of your entire spine through the crown of your head.
- Gaze softly straight ahead, or at the tip of your nose.
- Hold the pose for up to five minutes. To release the pose, first let go of your toes. Then, gently lift your knees and extend your legs once again along the floor.

This supine, or lying-down, version of the previous pose — Supta Baddha Konasana (SOOP-tah BAH-duh cone-AHS-uh-nuh) — stretches the hips, groins, and inner thigh muscles even further. It also opens the chest and improves oxygen flow, while deeply relaxing the whole body.
- Begin in the previous pose, Bound Angle (or Cobbler's) Pose (Baddha Konasana).
- Lean backward and bring your elbows to the floor. Then, lower your back all the way to the floor.
- Gently shift your buttocks from side to side, adjusting your position so your spine lengthens along the floor while maintaining the natural curve of the lower back.
- Draw your shoulder blades gently inward and let your arms relax with your palms facing up.
- Relax your buttocks and lengthen your tailbone toward your heels.
- Close your eyes. Let your awareness become fully internal.
- Let your breath occur naturally. Allow your body to feel heavy.
- Stay here for 1-10 minutes. To come out of the pose, draw your knees together. Then, roll to your right side and use your hands to press yourself up to a comfortable seated position.
Open Your Hips with Ease
Tight hips can be a nuisance, but be patient. Practice stretching your hips every day, and be sure to modify the poses as needed, depending on your current flexibility. Over time, your muscles will begin to relax, open, and lengthen!


