
Leg-strengthening Yoga Poses for Beginners

Yoga is a popular way to reduce stress and gain flexibility. It can also be a great way to build strength and power, especially in your legs! Standing yoga poses will build and tone the muscles in your legs, including your quadriceps, hamstrings, and calves. If you're an athlete looking to build more lower-body power, or if you just want to tone and shape your bottom half, yoga can help. Keep reading to learn some standing yoga poses that are suitable for beginners.
Benefits of Leg-strengthening Yoga Poses
Yoga uses the resistance of your bodyweight to strengthen and tone your muscles and joint structures. When you practice standing yoga poses, like the ones listed below, your weight shifts across both feet; this challenges your feet and leg muscles to keep you upright and stable. This helps to build muscular definition, while also helping to prevent injury and improve full-body coordination.
A well-rounded yoga practice will utilize every muscle of your body, not just your legs. As you learn to place and hold your body in correct alignment, you'll be working your entire body from head to toe. In standing yoga poses, your legs provide the foundation. Holding the poses will challenge your muscles and your mind! Keeping the pose steady and your breath smooth, while maintaining proper alignment, will improve your ability to concentrate and focus. With practice, you'll walk away from yoga with more powerful legs and a more powerful mind.
Caution
Do not practice these poses if you have a current or chronic injury to the hips, knees, or ankles. Be sure to check with your doctor before practicing yoga if you have any injuries, health issues, or concerns.
The Sequence
Practice this sequence three times a week. Repeat the entire sequence 2-3 times per practice, or as often as you like. It should take about 15 minutes to complete all of the poses. Take it slowly. Never force your body into any position. If you feel any sharp, pinching or jarring pain, come out of the pose immediately and rest. Always keep in mind these general guidelines for practicing yoga:
- Move slowly in and out of each pose.
- Keep your breath smooth and even throughout the practice.
- Practice with an empty stomach.
- Never strain or force yourself beyond your current abilities.
Do not change the arrangement of the poses. Keep the exact order of this sequence, as it has been organized to bring you the most benefits.
Actors, athletes, and musicians are often told to "break a leg" before their performance or big game. This comes from an old superstition, in which it's believed to be bad luck to wish someone good luck. So, to wish someone good luck, you do the opposite!
1. Chair Pose

Chair Pose — Utkatasana (OOT-kuh-TAHS-uh-nuh) — tones the entire body, particularly the thighs! It improves balance and posture, while also building heat in the body.
- Begin standing with your feet together and your big toes touching. If that is too difficult, step your feet hip-distance apart. Relax your arms at your sides.
- Inhale and raise your arms above your head, perpendicular to the floor.
- Exhale and bend your knees, bringing your thighs as parallel to the floor as they can get. Your knees will project out slightly over your feet, and your torso will form an approximate right angle over your thighs. Shift your weight into your heels.
- Tilt your head back slightly and gaze at a point between your hands.
- Hold for up to one minute. Then, inhale and straighten your legs, lifting through your arms. Exhale and release your arms back to your sides.
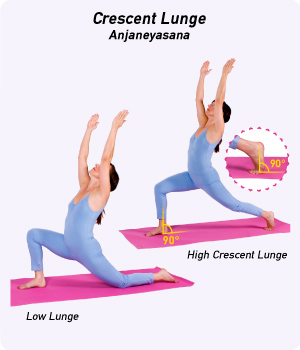
Crescent Lunge — Anjaneyasana (AHN-jah-nay-AHS-uh-nuh) — stretches the hip flexors while providing a challenge to the front and back thighs. It also strengthens and stretches the abdomen, chest, and shoulders.
- Begin standing at the top of your mat. Bend your knees, fold forward, and place your hands on the mat. Then, step your left foot to the back of the mat.
- Align your right knee over the heel of your right foot.
- Come onto the ball of your back foot, lifting your heel and drawing it forward so it aligns directly over your back toes.
- Lift your back leg strongly and straighten it completely, drawing your knee and quadriceps up toward the ceiling. Beginners can keep their back knee on the mat.
- Inhale as you raise your torso to an upright position. Sweep your arms overhead. Draw your tailbone toward the floor. Gaze up at your thumbs.
- Hold for up to one minute. To release the pose, step both feet forward to the top of the mat and come to a full standing position. Repeat on the other side.
3. Warrior I
.jpg)
This popular standing pose — Virabhadrasana I (veer-uh-buh-DRAHS-uh-nuh) — stretches the whole front side of the body. It also strengthens the thighs, ankles, and back. Students with neck injuries should keep their head in a neutral position — do not look up at the hands.
- Stand with your feet wide apart. Point your right foot to the top of the mat and turn your left foot slightly inward.
- Draw your shoulder blades in toward your upper back ribs. Keep your pelvis turned toward the front edge of your mat.
- Press your weight through your left heel. Then exhale as you bend your right knee over your right ankle. Your shin should be perpendicular to the floor.
- Reach up strongly through your arms. Ground down through your left foot and keep your left thigh lifting. Broaden across your belly and chest, and lift through your fingertips. Gently tilt your head back and gaze up at your thumbs.
- Hold for up to one minute. To release the pose, press your weight through your back heel, straighten your front leg, and lower your arms. Repeat on the other side.
4. Warrior II

A powerful full-body strengthener, Warrior II — Virabhadrasana II (veer-uh-buh-DRAHS-uh-nuh) — also increases stamina. It stretches the inner thighs, groins, and chest; and it also helps to relieve backaches and stimulate healthy digestion.
- Stand with your feet wide apart. Point your right foot to the top of the mat, and turn your left foot slightly inward.
- Raise your arms parallel to the floor, reaching out actively from fingertip to fingertip.
- Bend your front knee 90 degrees, making sure to keep your knee over your ankle. Press back through the outer edge of your left foot.
- Keep your torso perpendicular to the floor, lengthening the space between your shoulder blades and broadening across your collarbones.
- Draw your tailbone slightly downward and gaze out across your right middle finger. Hold for up to one minute. Repeat on the other side.

This standing-squat pose — Utkata Konasana (oot-KAH-tuh cone-AHS-uh-nuh) — strengthens the entire lower body, including the glutes, hips, thighs, calves, and ankles. It opens the hips and chest, and elongates the spine. It also improves balance, focus, and concentration.
- Stand with your feet wide apart and your hands on your hips. Turn your toes out slightly.
- On an exhalation, bend your knees directly over your toes and lower your hips into a squat. Work toward bringing your thighs parallel to the floor, but do not force yourself into the squat.
- Bring your hands into prayer position at your chest.
- Tuck your tailbone in slightly and press your hips forward as you draw your thighs back. Keep your knees in line with your toes. Soften your shoulders. Gaze softly at the horizon.
- Hold for up to 10 breaths. To release, slowly return your hands to your hips. Keeping your spine upright, inhale as you press firmly into your feet and straighten your legs. Step your feet together and release your arms to your sides.
Get a Leg Up
Practicing standing yoga poses will build lower-body strength in no time. Remember never to force a pose, and be careful that you don't over-strain your knees or ankles. Resisting your bodyweight will get your lower limbs lean, trim, and toned fast — with the added bonus of a calm and clear mind!


